I recently ran into a crunch getting some memory-intensive GIS analysis
completed. My work laptop has 2 CPUs and 4GB RAM, and running one instance
of the GRASS GIS r.horizon command on a 16GB
map was gobbling up 8GB of virtual RAM, which temporarily ground my machine
to a crawl before the process was killed.
GRASS is not yet installed on the high performance cluster at work, so I decided to try setting up my own medium performance cluster on a Digital Ocean1 VPS (which they refer to as ‘droplets’).
Why?
- Price
- Not only are their prices competitively low, they charge by the hour. This means you can have your own virtual machine with 64GB RAM and 20 CPUs for less than $1/hour. What’s more, the minimum period is one hour. Meaning, in theory, you could spin up a droplet, get 20 hours of processing done, and then shut it all down again with no further commitment.
- Quick & Easy Installation
- They offer a variety of GNU/Linux distributions, and once you’ve chosen you’ll be able to log on to your VPS in 60 seconds. This assumes you’re comfortable working on the command line. But if you’re doing cluster computing, if that’s not already true you’ll need to learn anyways.
- No Queues
- No need to worry about submitting batch jobs to a queue or waiting your turn. It’s your VPS, not shared with anyone else.
- Reuse Your Installation
- You pay for the time your droplet is available. However, you can save a ‘snapshot’, which is stored in your account. This allows you to destroy your droplet when you don’t need it. Then, simply reload it from the saved snapshot when you next need to crunch some numbers.
- Nerdy fun
- I have to admit, I was motivated in part by sheer, unbridled nerdy curiosity. Who wouldn’t want to ssh in to their very own server?
Why not?
This won’t be a practical solution in all cases. The longer your job will take to run, the more practical a real cluster becomes. It’s also worth noting that the CPUs aren’t particularly high-powered. So processes won’t run faster than on a recent laptop, assuming memory isn’t limiting. Another thing to consider is how much data you have to upload. This is not a viable approach for true ‘big data’ projects! Sending gigabytes over the open internet can be a very slow process, which is another point in favour of using a local HPC cluster.
How-To
With that in mind, here’s how I set up my temporary cluster:
Purchase the droplet
Browse over to Digital Ocean and sign up. Once you’re logged in, click ‘create’ and fill in your details:
- Hostname: it’s your server, call it what you like
- Size: they offer everything from 512MB/1 CPU up to 64GB/20 CPUs, with prices varying accordingly. From my project I selected 32GB/12 CPUs for $0.476/hour
- Region: pick something close, particularly if you’ll be up/downloading a lot of data. In my case, that’s New York.
- Linux Distribution: Choices include Ubuntu, Fedora, Debian, CentOS. I picked Debian, as that’s been my OS for the past decade. Regardless of the distribution, if you’re going to be working with large files, you will definitely want to select the 64bit version of your OS.
Security
Your root password and dedicated IP address will be emailed to you. Which means the NSA will know it before you do. So immediately log in and change your password. Actually, as soon as you log in you will be required to change your password in any case.
ssh root@123.45.67.89
You’ll probably also want a regular-strength user for non-administrative work, so add that next:
adduser tyler
At this point, you can log in as root or as your regular user. A more secure option is to authenticate via rsa keys. If you haven’t done this before, generate the key on your laptop/local computer:
ssh-keygen -t rsa
Note that you can use a blank passphrase here. Doing so will allow you to log in to the server without entering a password from now on. It also means that anyone that has physical access to your laptop also be able to log in to the server without a password. If you’ve lost control of your laptop, this is likely the least of your worries.
Next, transfer the key to the server:
ssh-copy-id tyler@123.45.67.89
You’ll be asked for your password again here. Now try logging into the server again:
ssh tyler@123.45.67.89
If everything is working correctly, you should be logged in to your droplet
without entering a password. If that is the case, we can proceed to shore
up our security. su to root user, and edit the ssh config files:
su
nano /etc/ssh/sshd_config
Look for and modify the following lines, then save the file. You need to
remove the comment character (#)from the beginning of the line, if it’s
there, and make sure they say ‘no’, not ‘yes’. You don’t need to modify any
other lines.
PermitRootLogin no
PasswordAuthentication no
The second line will prevent anyone from logging in using a password - you’ll only be able to login if you have the correct RSA key on your computer. This prevents ne’er-do-wells from trying to crack your password.
The first line will prevent anyone (including you!) from logging in directly as root. Meaning a potential cracker will have to get your RSA key in order to log on to the machine, and then they’ll have to crack the root password in order to do anything really nasty.
Note that if you want to access the server from another computer, you’ll
have to log in from each computer via password, or at least ssh-copy-id
the RSA key, before your set PasswordAuthentication no. Or, afterwards,
simply set it back to PasswordAuthentication yes briefly from the first
computer long enough for the second computer to log on and ssh-copy-id
their RSA key.
One final configuration detail: if you’re going to use an X server (to view
graphical windows of any kind), you need to modify /etc/ssh/ssh_config.
Make sure it includes the following uncommented line:
ForwardX11 yes
Now you need to reload the modified configuration. Still as root:
/etc/init.d/ssh reload
Given that we won’t have any outward facing servers on this machine, that should do for our security for now. If you do want to put some servers on here, you’ll definitely want to look into getting at least a firewall, and probably some intrusion detection software on here. The DigitalOcean tutorials are quite good in this area.
Install Software
Now that we have a passably secured machine, it’s time to install the software you’ll want. Given this is Debian:
- run
aptitudeas root - update
- install any security updates
- select and install your desired programs
In my case, to run GRASS, I needed the following:
aptitude install grass emacs screen htop avce00 \
  e00compr git mercurial xorg
(yes, you can run aptitude from the command line just like apt-get if
you like!)
Setup GRASS
GRASS will require you to create your database directory on the server (not as root!):
mkdir ~/grassdata
Next you need to transfer any files you need from your local machine:
rsync -az --progress --compresslevel=9 --partial \
  grassdata/location tyler@123.45.67.89:grassdata/
The options here include a, which among other things will transfer directories recursively, z, which will compress files prior to transfer (which dramatically reduces upload times), compresslevel=9, which uses the greatest amount of compression, and partial which allows rsync to pick up where it left off in case the connection is interrupted.
Running GRASS Inside Screen
Finally, we begin. Now we’re ready to use X windows, so when you log back
in you’ll want to use the X and C flags to ssh:
ssh -XC tyler@123.45.67.89
After logging back into your server, run screen. You’ll be transported
from a regular terminal window into a screen window. It will look almost
exactly the same. But it gives you some super powers, as we’ll see shortly.
Next, start GRASS. In order to conveniently run multiple processes at once,
I prefer to use text mode, hence I start with: grass -text. Navigate
through the charmingly archaic text windows until you’re at the familiar
GRASS text prompt.
One very helpful thing I discovered about GRASS is that each command is really a stand-alone program. Which has the lovely side-effect of giving us quick access to parallel programming. So long as any command foo does not require the output of command bar to run, and vice versa, you can run them both concurrently. Which means, in my case, I can do things like this:
r.slope.aspect elevin=dem slope=myslope aspect=myaspect &
r.horizon elevin=elevation horizonstep=30 \
    bufferzone=200 horizon=horangle \
    maxdistance=2000 &
You might find yourself getting carried away, starting process after
process. You might want to check on the load your server is under, before
you max out your RAM or CPUs. Here is where screen comes in handy.
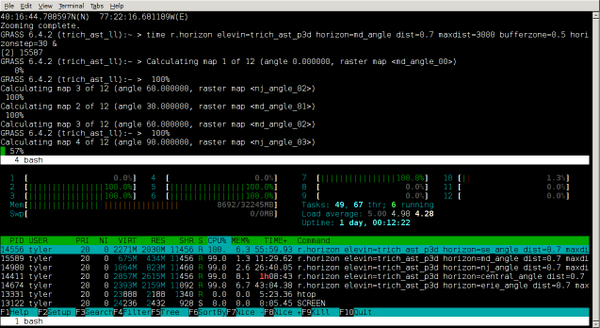
Type Ctrl-a c, and you’ll have a new terminal window to work in.
Your GRASS session is still working away in the background, and you can
check on how many processes you’ve spun out by calling htop. To go back
to the GRASS session, Ctrl-a " brings up a list of all the windows
available inside your screen instance, which you can select from with the
arrow keys.
Finally, you may need to shut down your laptop at some point while the
GRASS session is still running. To do this, we detach the screen
session, with Ctrl-a d. This tucks the session away out of sight, but it
continues to run. It will continue to run even after we log out of the
server. When you want to reconnect to the session, simply enter screen -r
at the command line and you’re back in charge.
screencan do a lot more than this, check out the docs for details!
Goodbye, but not Farewell
When you’ve completed all the work you need to do, you can save a snapshot of your server to use later on. Log in to your Digital Ocean account, select your droplet, and follow the links to create a snapshot. Once that’s done, you can safely destroy the droplet. A destroyed droplet will no longer accrue charges (and obviously it won’t be doing any processing either). To reinstate your droplet, follow the same steps you used above to create a droplet, but instead of selecting a Linux Distribution, select your snapshot from the My Images tab.
Comments or questions? Ping me on mastodon, or send me an email (address in sidebar)
-
Full disclaimer: this link uses my referral code, so if you sign up through here I’ll get a small kick-back from Digital Ocean. I hope this won’t lower your confidence in what some random guy on the internet has written. ↩︎