Default Profile
Notes based on the default profile describe by Andy Astbury on YouTube (posted 9 September 2021).
Andy recommends the following settings as your default RAW processing profile. His video describes his rationale in some detail.

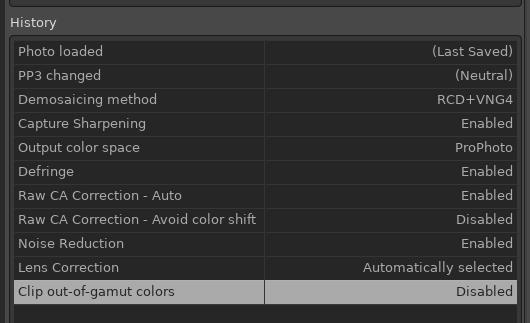
Start From the Built-in “Neutral” profile
Open a raw file in RawTherapee.
Select the (Neutral) profile in the profile selector at the upper right
side of the editor window. This will give you a very ‘flat’ (linear) view
of the image. This is desireable to allow you to see all of the detail
available in your file, in order to better decide how to approach your
processing. From this linear beginning you’ll set the exposure etc. to suit
your image.
Set the Output Profile
tldr; use RTv4_sRGB for finished photos to be posted online, or for which
you don’t control the software used to view them; use ProPhoto (or maybe
RTv4_Large) when you are going to further edit your images in Gimp,
Photoshop, Lightroom, or edit/print/view with other programs that
understand wide gamut profiles.
RTv4_sRGB for the web, ProPhoto for Photoshop/Gimp
If you’re exporting from RawTherapee to Gimp, Photoshop, or Lightroom,
Astbury recommends using the ProPhoto colour profile, in order to maintain
maximum compatibility with PhotoShop and Lightroom. This is also the
default working profile (NB: not the default output profile!) for
RawTherapee. However, by default, RawTherapee doesn’t offer ProPhoto as an
output profile. In order to use it, you need to install the
ProPhoto.icc file.
Download the file ICCProfiles.zip from
chromasoft.
Unzip the files and copy them to the profile directory for your system. You
can find this (and change it if you like) in the Preferences dialog,
under Colour Management.
You could also use RTv4_Large, which is provided with RawTherapee and
provides a similar extended gamut to ProPhoto.
Note that Astbury’s video includes the aside:
Only do this if you want to use and maintain a fully ProPhotoRGB workflow between RawTherapee, Photoshop, and Lightroom.
This is because the ProPhoto profile is not understood by many programs,
so what your audience sees will depend on how they view it. Consequently,
regardless of what your workflow is, when you export a ‘finished’ image for
display online, you should use a sRGB profile. RawTherapee provides
RTv4_sRGB
for this purpose. It’s an extended sRGB profile that degrades gracefully to
plain sRGB in programs that don’t understand the full RTv4_sRGB profile.
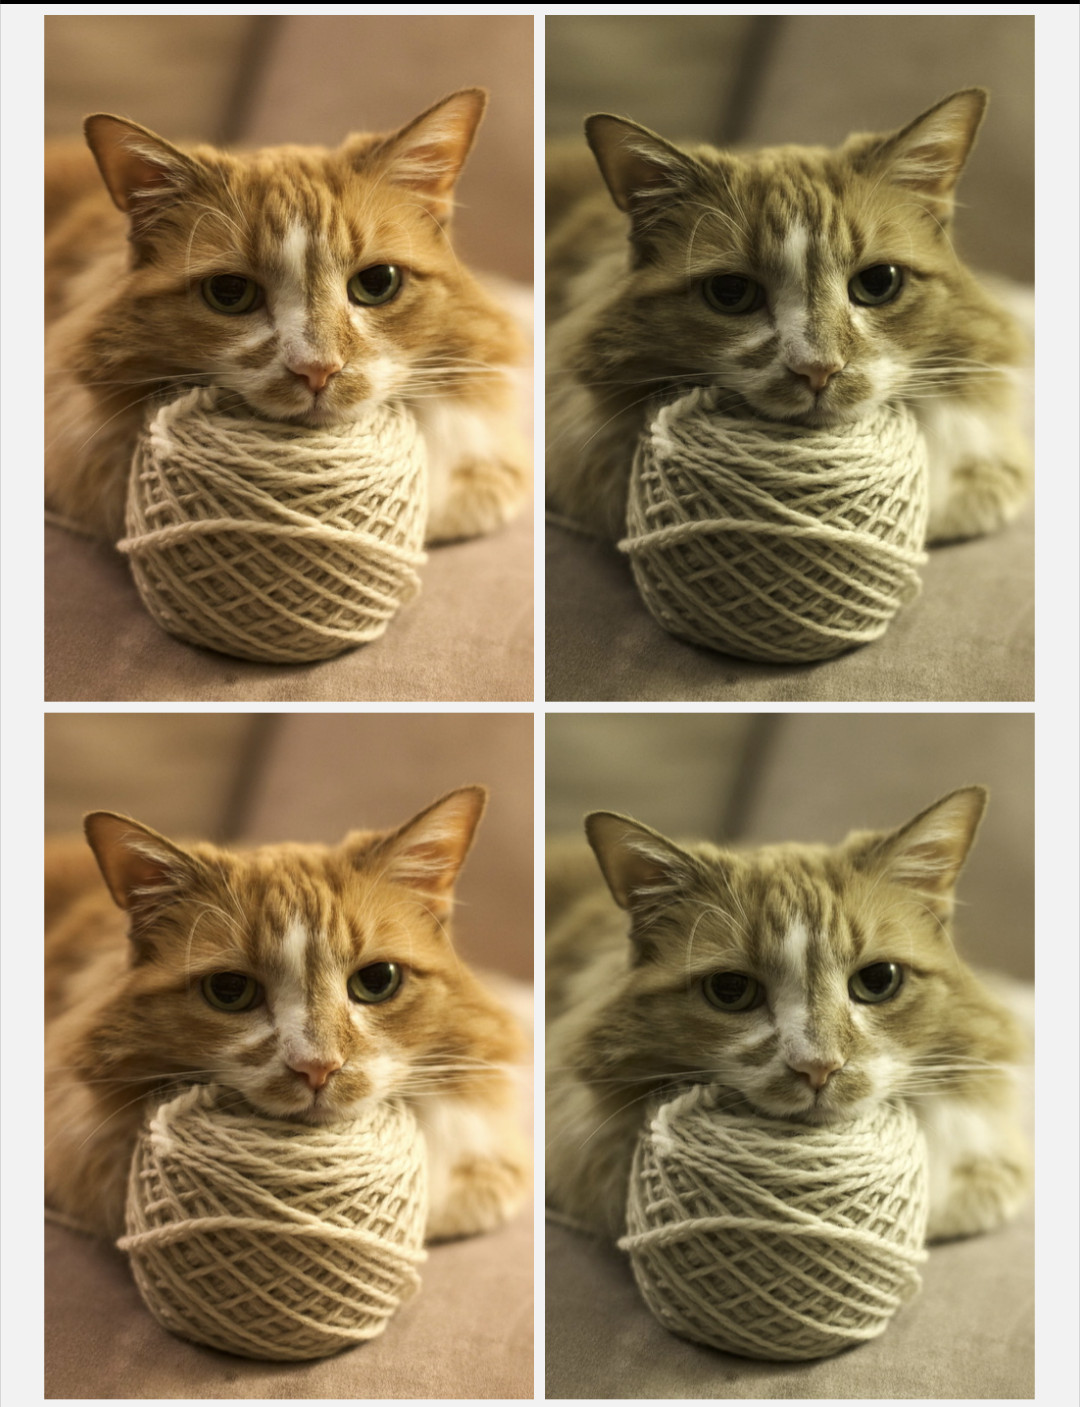
As an example of the potential problems with profiles, on my android phone,
Firefox, and also the Flickr app, don’t provide accurate renderings of the
ProPhoto or rtv4_Large profiles (shown on the right), but are just fine
with sRGB and rtv4_sRGB (shown on the left).

This is hard to anticipate, because the same images, on the same website, may appear differently on different browsers, OS, or other combinations. In this case, my Linux laptop with firefox displays the images properly, as does Chrome on Android. You can see the actual images on my Flickr account to see for yourself.
Set the Demosaicing Algorithm
The default demosaicing algorithm is AMaZE. This is very good for high
frequency detail (i.e., areas in sharp focus, detailed subjects), but not
so good for low frequency detail (i.e., out of focus areas, soft
background). Astbury prefers RCD for sharp detail, and VNG4 for out of
focus areas.
You get both together with the setting RCD+VNG4. With this setting, a
contrast setting is used to determine which areas of the image have high
contrast, and will have RCD applied; and which have low contrast, and
will get VNG4 applied. This value is set automatically when the box is
checked. Leave the box checked.
Capture Sharpening
Further down in the raw tab, turn on the Capture Sharpening option, and
leave it at the default setting (i.e., the automatic check box is
ticked). This will address details lost due to in-camera
blurring (defraction,
anti-aliasing etc). You will usually want Capture Sharpening applied,
which will often be combined with either Unsharp Mask or RL Deconvolution.
Auto Chromatic Aberration Correction
Located in the Raw tab: turn on this checkbox, but turn off Avoid colour shift.
Andy discusses Avoid Colour Shift as a “Top Tip” in his video on local
adjustments.
The issue is that, in some circumstances, Avoid Colour Shift can actually
cause a colour shift. That’s counter-intuitive, and you probably
wouldn’t think to turn off this feature to reduce colour tinting. So better
to leave it off by default, and only apply it intentionally such that you
might detect how it improves (or degrades) a particular image.
Turn on Defringe
In the Detail tab. Use default settings.
Turn on Noise Reduction
Also in the Detail tab. Turn it on, set colour space to L*a*b*, mode to
Conservative, Luminance to slider, with the actual sliders set to 0
(these should be the default settings).
Uncheck ‘Clip Out of Gamut Colors’
In the exposure tab. Mentioned in the Pinned comment below the video.
Set the Profiled Lens Correction to Auto
Not mentioned by Astbury, this is under the Transform tab. I set it to
Automatically selected, which usually sets the correction to the camera
at least. I have to select the lens manually, but this at least saves one
step.
Don’t turn on Dead Pixels and Hot Pixel Filters
Astbury previously recommended this, but no longer considers it a good
default setting. These options are in the Raw tab, in the
Preprocessing section.
Specifically, Andy has explained (in the comments below the default profile video):
I no longer class [dead pixels and hot pixel filters] as essential - they only need activating if an individual image needs them. If they are not needed they could prove slightly detrimental.
To which KuruGDI added:
When I take images with small grained details it’s sometimes degrading the image quality for me with these settings. The software thinks that these tiny spots should be fixed while in reality it’s just a small detail. I could see this problem especially in area that were just slightly out of focus.
Save the Profile
Save the profile! Click the disk icon in the profile dialog at the upper
right, and give the profile a useful name, like myBase, or AstburyBase
or something like that.
Set the Profile as your default
Open the Preferences dialog, open the Image Processing tab, and set the
default profile for raw photos to your new profile.
At this point, this neutral++ profile will be applied to every Raw image
the first time you open it, providing the base corrections for the image.
All additional changes you make for that particular image are stored in the
image-specific profile, so that on the second and subsequent times that you
open the image, you’ll see everything you’ve added in addition to the base
profile.
Lightening an Image
Notes from RawTherapee Basics: 3 Ways to Lighten Images, posted September 15, 2021.
Astbury prefers the third method, as it is most ’tractable’ - provides you with a great deal of fine-control over brightness, without making a mess of contrast and saturation. However, each of the three have their place, and you may end up using a different one (or a combination) for different images.
Method 1: Exposure Compensation
The exposure slider increases or decreases exposure for the entire image. Getting your midtones where you want may result in blown highlights.
You can correct for this with:
Highlight Reconstruction
Guesses what the best colour for the clipped highlights should be based on adjacent pixels, or data in other channels (i.e., the values in the red and green channel can be used to infer the blue channel, if only the blue channel is blown out). Primarily for details that are clipped (i.e. blown out in the RAW), but also used in combination with Highlight Compression to protect highlights clipped during editing.
Options include:
- Luminance Recovery: details will be neutral gray, doesn’t attempt to restore colors.
- Color propagation: recovers the luminance of highlights, and also the colors, using adjacent colors.
- CIELab: reduces luminance, and then restores colors.
- Blend: replaces clipped colors with values from nearby areas.
Highlight Compression
Recovers highlights that present (i.e., not blown out) in the raw file, but have been clipped by editing, such as exposure compensation. Works in conjunction with highlight reconstruction.
A general rule of thumb is the histogram for each colour channel should reach the right and left side of the histogram panel, but should not be clipped at either end. Unless you have a very flat image (e.g. misty/foggy landscape).
The Problem With Exposure Compensation
Exposure compensation works in the RGB space, applying a uniform shift to exposure AND contrast AND saturation to the entire image. This makes it difficult to tweak brightness independent from contrast, and vice versa, and often leads to garrish/glossy images. So Astbury recommends one of the following two options instead.
Method 2: L*A*B* Adjustments
Turning on the LAB Adjustments tab, you can independently modify brightness, contrast, and chromaticity (saturation), with the three sliders. Or if you want to really fine-tune it, you can use the curves and equalizers below.
Method 3: Abstract Profile
New tool available in RawTherapee 5.9, found in the Colour Management tab, between Working Profile and Output Profile.
Set the Abstract Profile to Custom, and you will be presented with two
sliders:
-
Gamma : Controls the highlights, without modifying the darker tones.
-
Slope : Controls the darker areas, without modifying the lighter tones.
These sliders interact - moving the Slope up will push some of the midtones up such that they are bright enough to be influenced by Gamma. Meaning you have to play with both sliders in concert to find a balance that works.
Noise Reduction
Details panel -> Noise Reduction -> change slider to curve. Increase the height of the curve to increase noise reduction. Slide the bottom of the noise reduction tone curve to the left to restrict noise reduction to darker tones, or to the right to include lighter tones1.
-
Thanks to Wayne Sutton for correcting the previous version! ↩︎